![Gretxp VR Dev Agency](https://static.wixstatic.com/media/496d05_10856fcc357547f98603b70b424438a3~mv2.jpg/v1/fill/w_139,h_59,al_c,q_80,usm_0.66_1.00_0.01,enc_avif,quality_auto/1.jpg)
Start 3D Creation
After opening the BuildVr Website, click the Start Now button to start your 3D creation.
​
![Screenshot 2024-05-07 120646.png](https://static.wixstatic.com/media/a3e974_d8e5fdd53c3144a290e1169c83a281a5~mv2.png/v1/fill/w_430,h_249,al_c,q_85,usm_0.66_1.00_0.01,enc_avif,quality_auto/Screenshot%202024-05-07%20120646.png)
Select Environment
In the side panel, under the "Select Environment Model" heading click on a card, then select an environment and use it in your 3D creation.
![Brown Modern New Product Instagram Post (1).png](https://static.wixstatic.com/media/a3e974_f0ecbb64ac0c4f9392a2088a72bbeb8a~mv2.png/v1/fill/w_523,h_261,al_c,q_85,usm_0.66_1.00_0.01,enc_avif,quality_auto/Brown%20Modern%20New%20Product%20%20Instagram%20Post%20(1).png)
![Screenshot 2024-05-07 120646.png](https://static.wixstatic.com/media/a3e974_d8e5fdd53c3144a290e1169c83a281a5~mv2.png/v1/fill/w_430,h_249,al_c,q_85,usm_0.66_1.00_0.01,enc_avif,quality_auto/Screenshot%202024-05-07%20120646.png)
Select Characters
In the side panel, go to "Add Ons" and click on "Avatars" to select a character and use it in your 3D creation.
![Black And Red Fast Food Restaurant Advertisement Simple Flyer.png](https://static.wixstatic.com/media/a3e974_d51832d59ea1492e8549b4e63af47afb~mv2.png/v1/fill/w_488,h_277,al_c,q_85,usm_0.66_1.00_0.01,enc_avif,quality_auto/a3e974_d51832d59ea1492e8549b4e63af47afb~mv2.png)
Select Props
In the side panel, under the "Select Add-ons" heading, click on "Props" to select a prop and use it in your 3D creation.
![image.png](https://static.wixstatic.com/media/a3e974_dd2b12711def459fb7affcc6e499bc77~mv2.png/v1/fill/w_530,h_291,al_c,q_85,usm_0.66_1.00_0.01,enc_avif,quality_auto/a3e974_dd2b12711def459fb7affcc6e499bc77~mv2.png)
Add Video to Scene
On the side panel, navigate to "Uploads" and select "Video" to add it to the scene.
![image.png](https://static.wixstatic.com/media/a3e974_5d95857161814876bca2b6ab7ce6fa8b~mv2.png/v1/fill/w_600,h_286,al_c,q_85,enc_avif,quality_auto/a3e974_5d95857161814876bca2b6ab7ce6fa8b~mv2.png)
Add Lights to Scene
On the Side Bar, click on "Add Light" to configure lights and add it in your scene.
![image.png](https://static.wixstatic.com/media/a3e974_5a4f5f7dd2d2432b9e6d08f76d9512e6~mv2.png/v1/fill/w_662,h_253,al_c,lg_1,q_85,enc_avif,quality_auto/a3e974_5a4f5f7dd2d2432b9e6d08f76d9512e6~mv2.png)
Add Background Image / Colour
In the side panel, click on "Uploads" and select "Background Image" to acquire a skybox for your scene.
![image.png](https://static.wixstatic.com/media/a3e974_c8b59a3159a84b2fba28891d07cc1059~mv2.png/v1/fill/w_452,h_236,al_c,q_85,usm_0.66_1.00_0.01,enc_avif,quality_auto/a3e974_c8b59a3159a84b2fba28891d07cc1059~mv2.png)
Alternatively, choose "Background Colour" to add color to your background scene.
![image_edited.jpg](https://static.wixstatic.com/media/f82157_196604d20f6940ffa139f6535c43fb14~mv2.jpg/v1/fill/w_455,h_242,al_c,q_80,usm_0.66_1.00_0.01,enc_avif,quality_auto/image_edited.jpg)
Add Music to Scene
In the side panel, under the "Media" heading, click on "Music" to select music and integrate it into your 3D creation.
![Banner .png](https://static.wixstatic.com/media/a3e974_e0e0ca7bfc5147e68f81d7b57d7708cc~mv2.png/v1/fill/w_691,h_265,al_c,lg_1,q_85,enc_avif,quality_auto/a3e974_e0e0ca7bfc5147e68f81d7b57d7708cc~mv2.png)
Changing Textures of surfaces
On the sidebar, click on "Custom", then select "Surface Texture Configurator", and apply various textures to your scene.
![Black And Red Fast Food Restaurant Advertisement Simple Flyer.png](https://static.wixstatic.com/media/f82157_1a7aaaa7a0d349de8d230c4ba2c4cfc6~mv2.png/v1/fill/w_600,h_337,al_c,q_85,enc_avif,quality_auto/f82157_1a7aaaa7a0d349de8d230c4ba2c4cfc6~mv2.png)
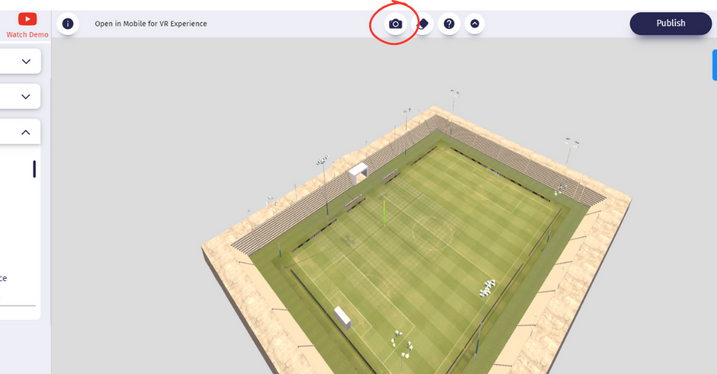
Taking Pictures of the scene
On the Top Bar, click on "Camera" to download the picture of your scene.
![Brown Modern New Product Instagram Post (9).png](https://static.wixstatic.com/media/a3e974_e8a4cf316d45469082f97b81316e4cbe~mv2.png/v1/fill/w_717,h_374,al_c,lg_1,q_85,enc_avif,quality_auto/a3e974_e8a4cf316d45469082f97b81316e4cbe~mv2.png)
Saving the scene
On the Top Bar, click on "Publish" then add details to save and publish your scene.
![Brown Modern New Product Instagram Post (10).png](https://static.wixstatic.com/media/a3e974_71976b374cab48298f63c5e049677ad0~mv2.png/v1/fill/w_600,h_338,al_c,q_85,enc_avif,quality_auto/a3e974_71976b374cab48298f63c5e049677ad0~mv2.png)
Creating Webpage with multiple 3d scenes
In the side panel, under the "Select VR/3D Space" heading click on "Website" to create a 3D website.
![Brown Modern New Product Instagram Post (11).png](https://static.wixstatic.com/media/a3e974_ed9c292c982e41a79997316a2d6aeecc~mv2.png/v1/fill/w_600,h_369,al_c,q_85,enc_avif,quality_auto/a3e974_ed9c292c982e41a79997316a2d6aeecc~mv2.png)
Viewing and editing saved scenes
In the side panel, click on "MyVR", then select the saved scene to edit or view.
![Screenshot 2024-05-07 160214.png](https://static.wixstatic.com/media/a3e974_c6f2cb5093904a1897c6577b8d5d480c~mv2.png/v1/fill/w_430,h_205,al_c,q_85,usm_0.66_1.00_0.01,enc_avif,quality_auto/Screenshot%202024-05-07%20160214.png)
Customize the Model size and position
in the side panel, click on "Custom" then select the model and change the scale, position and rotaion of the model.
![Screenshot 2024-05-07 160214.png](https://static.wixstatic.com/media/a3e974_c6f2cb5093904a1897c6577b8d5d480c~mv2.png/v1/fill/w_430,h_205,al_c,q_85,usm_0.66_1.00_0.01,enc_avif,quality_auto/Screenshot%202024-05-07%20160214.png)